|
|
|
                   
|
    Avast! Some scurvy dogs ha'overtaken yer ship, and be prepared to fill ye full o' cannon before they board! Assuming ye're an officer, it be possible that ye might have to take the helm. Here be some helpful hints to start ye off! Sea battle (as known as battle nav, battle navigation, battle, and various other names. This is NOT the swordfighting half of the overall sea battle) is the art o' cannonplay. You attempt to sail in a way that conserves movement and gunning tokens, while yer crew works hard to feed ye more o' these tokens. The aim depends on why ye're sailing- if ye have valuable goods onboard, it can be to evade your opponent until ye can safely disengage. If ye're pillaging, it will be to fire enough cannon, or have yer enemy hit rocks enough, that they are at a disadvantage in the swordfight. If ye be a mad pirate-vs-pirate bucaneer, then it will be to demoralise and disadvantage yer opponents. Sea battle is a puzzle controlled entirely through dragging This tutorial uses mocked-up graphics taken directly from the game. 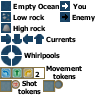
This tutorial needs updating. The old one has been left in the meantime. Let's introduce the piece properties, at this point, too. First is the order they get used in. Each turn, the first thing the puzzle checks is if you're moving. If you've placed a movement token, then that happens first. Then any current or whirlpool you're standing on after that takes place. Then, if you've placed a token, you'll fire your cannons. If you're completely unfamiliar with battle nav, then you should know that turning won't turn you on the spot. It forms and "arc," and you move one square forward, then one square in the direction you will end up facing. Cannons fire from the side of your ship, and it automatically chooses the direction that will be closest to hitting. Rocks are damaging to hit, quite obviously, so avoid facing them at all costs- and if you do end up facing them, turn towards the direction you wish to face, (you will hit the rock and rotate about on just your own square) and then use the best escape route. Avoid currents that point to rocks whenever possible. Low rocks (these look like they have pebbles in them, rather than looking like small rocky islands) can be shot over with your cannons. Big rocks will block your shots. Here's an example of the worst possible move you can make using rocks: 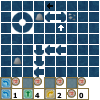
Not only can your opponent cannon you until you manage to escape, but you're forced against the rocks for every move until you do escape. Currents will move you one square in the direction they point. (again, between your own move and your oppurtunity to fire you cannons) Finally, whirlpools move AND rotate you. The easiest way to explain this is that they are the EXACT opposite of a left turn. (in the figure below, they would end up on the oppose square of the whirlpool, facing upwards, after the first turn) Here's an example of how you should use whirlpools. (to get two "guarenteed" hits per turn) Note that this one should only be used if your opponent isn't moving/has run out of tokens, so like all other moves it has disadvantages. 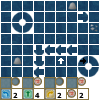 Just to quickly point out, there have been recent claims that brigands are "psychic." This doesn't appear to be 100% true to me, however, I do think their AI is programmed to be able to "guess" the most common moves and respond maliciously to them. Thus you have to outsmart the AI with regard to what you want to do, and attempt more complex manuevres. Here's a reasonably risky set of moves that will give you a 3/4 chance for 1 hit, (remember, there are four options for every move- stay still, move forward, turn left, turn right. On top of that there's an independant two options for whether to fire or not) and possibly (if they move forward on their first move, and don't stay still on their second move (3/16 chance though)) hit twice, if you're willing to risk the second cannon. 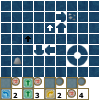
Why is this risky? If you're fighting a human and try to pull this off, they may well shoot back. That said, the two moves on the indicator might throw them off. The AI may also anticipate this as it is a pretty common move. Can you tell which image will have a 50% chance to hit? Which is the MOST effective move? Highlight the text below (from left to right to ensure you get all of it) for an answer.   
Left: 50%, Middle: 25% Right: One hit=62.5% Two=12.5%  |
 tokens from the bottom of the screen into receptacles directly above them, or by clicking on the different spaces that accept tokens- left-clicking
  will place a left turn, right-clicking
  will place a right turn, and using the wheel button
  will place a forwards token. Clicking on the cannon receptacles will cycle through fire, double-fire, (if you're on a large enough ship) and grapple.