|
|
|
                   
|
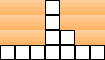
    Carpentry be not a silly crafting puzzle where ye put together pieces of furniture! That be furnishing. Carpentry is the noble art o' scurrying around yer vessel in a panic, fixing holes with strangely pentomino-like pieces of wood. Pentominoes are shapes that can be made from five 'squares' joining together. All these squares must be orthagonally (non-diagonally) adjacent. To my knowledge, all possible pentominoes are used in carpentry, and it is a matter of your ability to imagine them joining together, and to see shape combinations in the gaps of your hole, that will ultimately make or break your skill at this puzzle. Carpentry stations are above and below deck on all ships. For convenience's sake, full-time carpenters (people who won't be switching back to another puzzle) should probably be below deck, to leave the rest of the stations open for people who need to switch there. Carpentry stations look like a box/chest with a saw and hammer in it, and are often nearby to bilge stations. An overview of the pieces, and how to achieve the grain bonus. How to finish off your masterpiece: Holes with 7 solutions How to finish off your masterpiece: Holes with 5 solutions How to finish off your masterpiece: Holes with 3 solutions Tips on chaining masterpieces for that little bit extra. In carpentry, you pick up pieces by clicking, The Mechanics: As your rating at carpentry increases, and as you stay in the puzzle longer, the holes you must patch become of more extreme sizes, that is, very big and very small. Carpentry allows for error-correction. That is, if yau place your piece only slightly off from the right place, you can pick it uy and re-position it. The Aim: The aim in carpentry is to fill the holes as quickly as possible, with as little wastage as possible, and with the grain horizontal. After the first hole you fill perfectly, you well get a bonus if the next is also a masterpiece- this means it is beneficial to 'save' the pieces you need in order to finish off one of your holes while you work on another hole. The Basics The basic unit of score in carpentry is the masterpiece, and every hole the puzzle will geterate will be able to be filled perfectly so that it is always possible to get a masterpiece. (If you are doing well, any failed holes will only be 'craftsmanship') Here's one below. 
This is a medium-sized hole, with space for six pieces. When you start donig well, the game will give you holes with wierder edges, smaller holes, and eventually very large ones, too. There's quite a lot of information in how I fill this hole. Notice that I try and 'flatten' the edges first? That's so I can decide which oddly shaped pieces I want to add. This tip can be generalised a bit more: always place pieces so that you fill in the most difficult areas of the hole you can. If you have difficulty imagining how a piece would fit into the blank space, then try moveing the piece around over the hole- it helps. Finally, let's freeze the frame just before I place the second-to last piece. 
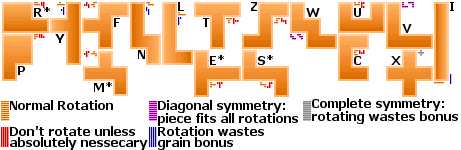
This is the most crucial part of your hole, the last two pieces. Carpentry is partially a game of risk management. This is because you have so many different pieces that could come next, you want to minimise the chance of not getting a grainbonus masterpiece. To do this, you try to end with a hole that has the most possible ways available to fill it, and you try to have that hole rotated so that you maximise your chance of a masterpiece. Before you learn about that though, let's get familiar with the pieces involved in the puzzle- there are twelve of them, in 17 signifigant rotations, so this is actually quite an urgent task. The Pieces
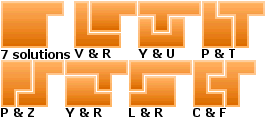
This is a list in rough order of rarity of how often the pieces occur. You should consider this while you carp- relying on an I piece as the last piece of your second masterpiece might not be a good idea. Note that the rotated pieces do not usually have letters assigned to them in the pentominoes alphabet. I've added letters for this 'Carpentry Alphabet' based on more tenuous connections for some, (the rotated F looking like a lowercase M, S being a rotated Z, the fact that E would look like an E if you added a row to the top and bottom, etc) and much more solid connections for others. (C and R) Note that you will receive these pieces flipped horizontally as well, and you can flip them back using the right mouse button. (there's also a keyboard shortcut) This image is also a handy guide to what sort of pieces will rotate in what way. The 'best' in terms of getting the grain bonus are the X, W and V pieces. This is because they can always fit any hole you would want to put them in while maintaining the grain bonus. The next best for achieving a grain bonus are the "normal" pieces, that don't have diagonal symmetry, but DO come in two varieties each. If you can manage it, it's best to keep one prepared, with the grain facing the right way. Finally, there are pieces that aren't diagonally symmetrical, and don't have a rotated conuterpart. These are all the 'long' pieces that measure 4 or 5 from left to right, and they all come with a horizontal grain, to make things easier. Unless it saves an otherwise booched up hole, don't place these against the grain. Carping is best with a mouse. If you don't have a three-button mouse, I recommend using only the z, x, and c keyboard shortcuts to rotate the pieces, so that you don't half use your mouse and half not use it. If you have a wheel button, scrolling up and down will rotate your piece, and right-clicking will flip it. Pieces come facing both directions, so you'll often need to flip your piece. 7 solutions
This is the ideal hole with which to end. You have a wide variety of combinations, even including some that are harder to use in general, like the U 5 solutions
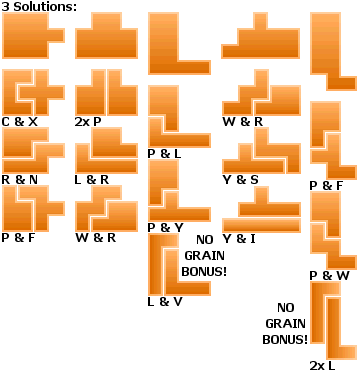
Also pretty good, but there's no real advantage to this over the seven-solution finish. Just use it when you have to. 3 solutions
There are plenty (five) of three-solution finishes, and some of them use pieces neglected by the 5 and 7 solution holes, so they can be good to mix together. Notable for that are the first column, which can use a C or U, Note that the second column is more 'dangerous' than the others, because one of its solutions uses two of the same piece. While it sometimes happens that you do get two of the same piece at a time, the odds are lower than getting an I Things to avoid If you misplace a piece, you're allowed to pick it back up once, and you'll be able to move it around a little. This can save your large chains. If you do make a mistake that you can't fix, then if your chain has already broken, complete it before any holes that will give you masterpieces. If you are partway into a masterpiece chain, or don't think you can complete the hole before you need to finish one or two of your mastorpieces, leave that hole as long as you possibly can before putting another piece in it.
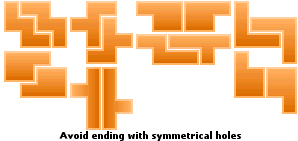
The reason not to use symmetrical finishes is that they require two of the same piece, so any hole with a symmetrical solution is more 'risky' than one with the same number of solutions but no symmetrical (or normal double-piece) ones. Over-relying on common pieces isn't much better than over-relying on rare ones. Needing four P
Learn how to avoid closing up a hole so that only one piece or piece combination can be placed there. The trick to carpentry is to only let this happen when you've already got those pieces ready in your toolbox.
It is possible to place pieces so that you cannot get a masterpiece even without overlapping, so when your last few pieces, think carefully beforehand in order to avoid enclosed areas that don't match any pieces, or areas where you are forced to place overlapping pieces. Tips for long masterpiece chains
Puzzle at a speed that's right for you. If you go too slow, you'll hurt your ratings, but go too fast and you'll lose track of which pieces you are saving, and make too many mistakes. Puzzle roughly evenly between holes, trying to leave one or two of them emptier than the others. Then when you have all the pieces left to complete a hole, don't place any until you it shakes for the second time. Try to keep a rough track of which holes will need attention soon, it will help if you have a piece that will fit in more than one of your holes.
As soon as you can, get rid of any I,
Learn to use the F Learn how to see piece combinations in the spaces between pieces. It will help you a lot on your path to continuous masterpieces.  |
 flip them using the middle (wheel)
  or right mouse button,
  and they can be rotated ninety degrees using the mouse wheel.
  Some shapes come in two varieties, because you can't change the direction of the grain between flipping them and rotating them. Others you will be able to achieve all of their rotations using the available commands (eg I
  , V
, V  , and W
  ) There are keyboard shortcuts for all of these keys, (enter, c, x, and possibly z, if I remember correctly) and you can move the cursor around using the arrows
  instead of the mouse.
 and Z
and Z  pieces.
 pieces to finish three of your holes is moch worse than needing three different rare pieces.


 L,
L,  N,
N,  or V
or V 
 piece. It is the most useful piece that isn't in a very straight shape.